Godox as a brand is quite well-known and a strong performer in the world of photographers! It is a brand that is around the world since 1993 and that means to keep launching for almost two decades. Well, what does Godox bring to the world? The mission of the Godox company is to bring to their customers (mostly photographers) super high-quality products.
The softboxes from Godox are quite famous and used by many people. That’s why in this article I will tell you How to Set Up a Godox Softbox. Even though it may look like it is a hard-to-swallow issue, don’t worry because it can be done quite easily.
A softbox can be used for food photography, product photography and many more things.
Let’s get this guide started!
Before starting to tell you how to setup a softbox, I will mention the pieces or the things that you need, in order to be easier for you to setup a Godox softbox in the proper way. Here is what is needed: Lightstand, Light Source, Rods, Bracket, and the Softbox.
The Godox softboxes in general come with the mount (that holds the softbox in place), the rods, a bracket, and the softbox itself with two pieces of diffusers (pieces of clothing that are attached).
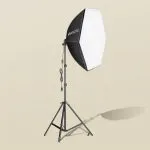
Set Up the Lightstand
First of all, what needs to be set up is the light stand which is one of the most important parts of setting up a softbox. What should be done in this case, a tip in a way is to adjust the light stand up to your shoulder height; because you are more able to have control over it.
Set Up the Light Source
What is a light stand without a light source? Well as seen, the next thing that you should do during this process is to put the light source on the light stand, so that it allows us to put the softbox on it. On the light source’s bottom part, you will notice a piece that includes some screws. Attach that piece on the light stand and securely tighten the screws so the light won’t fall off.
Check out the Rods, the Brackets, and the Diffusers
A Softbox as mentioned comes with some rods. What are they used for? The rods are those slim pieces of soft metal used to securely put the softbox, and make it work in the best way possible. A bracket, on the other hand, is the strongest part of the softbox.
It is a rounded metal, in this case, that is put in the middle part; in which are attached the rods that I mentioned. The diffuser is the most important part that completely finishes your job.
Put each and every rod in the piece of clothing, and don’t worry because that piece has some little handles all over it. Once you’ve noticed that the rods are securely put into the bracket and the handles in the clothing part, the next thing that you should do is to put the smaller piece of clothing on the back part. It is used so the light that comes out of the light source won’t escape from the back part.
It is fully ready, just put it in the place and have fun using it!
Final Thoughts
As said at the beginning, even though it may sound like a very difficult thing to do, it is one of the easiest ones. In case you need to know more about softboxes or you are in doubt about what softbox you need, check out our article on What size Softbox do you need?

Camera Tester & Reviewer
I spend most of my time taking photos & videos of everything in sight. Yes, I am a stock photographer and I’ve probably taken more than 700,000 photos so far.