Hopefully, I’ll clarify any doubts you may have and provide some insight into blue hour photos.
Let’s get started without wasting time further.
What Is Blue Hour Photography?
The so-called ‘blue hour’ occurs shortly after sunset, around dusk, when the sky takes on indigo colors before becoming dense black. It’s a one-of-a-kind moment that can’t be duplicated, even with the best photo editing software.
Simply put, the Blue hour is the time of day when the sky has a midnight blue color before sunrise and after sunset.
Just like with Golden hour, despite both being called “hours” they don’t last an hour it mostly depends on the time zone, weather conditions, etc. However, its average length should go from 20 minutes up to 40 minutes.
Below you will find some perfect examples of Blue Hour Photography.

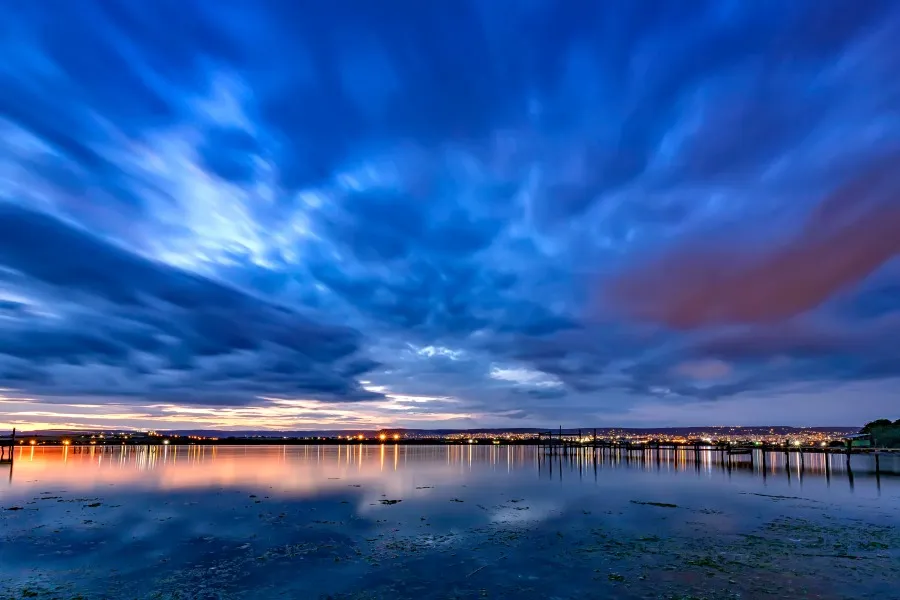
An example of how a lake seems during a blue hour shot, as you can see everything merges together in a dark blue-ish manner.
However, the beauty of the blue hour is that it does not appear the same in all types of photography; for example, the tone of a city photo alters into blue tones.

But, once again, factors such as time and weather play a part in its tonality.
Blue Hour Photography Vs Golden Hour Photography

The golden photography occurs between sunrise and sunset when the sun is low on the horizon and casts a warm orange-ish glow. The blue hour occurs immediately before sunrise and just after sunset, when the sun is slightly below the horizon, resulting in cooler blue-ish tones.
There is no denying that both hours are amazing and stunning, yet for unknown reasons, the golden hour is more popular among people in general.
Blue hour, on the other hand, is underappreciated and, in my opinion, more attractive than a golden hour.
Unlike sunrise and sunset, when you can capture a wide spectrum of colors, pictures taken during blue hour, have pretty much the same tone; at the correct times of day, even bright subjects like trees in the spring season, take on a blue tone.
That’s simply my opinion; regardless of the choice you choose, both golden hour and blue hour deliver breathtaking images.
What Kind of Photos Should You Take During Blue Hour?

While this is a question that might cross your mind, you should not feel limited or say you should not limit your creativity when taking blue hour photography.
Blue hour is beautiful in general, so don’t allow your preferred genre to keep you from enjoying some ethereal blue light. You may capture dramatic city scenes or architectural photographs with long exposures. By combining flash and natural light, you may even create blue hour portraits.
However, a landscape with the sky plainly visible is a perfect way to get the most out of a blue hour photography shot.
Camera Equipment

You can’t just go out and wait for a blue hour with your out-of-the-box camera; It is not that easy, there’s more to it than that. Prior, you’ll need to tweak some settings and use additional equipment.
In photography when most of your images come in the same color, which is blue in this case; it is quite hard to find the right exposure.
Not only that but the lack of light can seriously interfere with your camera settings and end up ruining everything.
First thing first, make sure you have the right camera; if you don’t, you might want to take a look at some of the cameras I mentioned; they are excellent night photography performers that will also work wonders for blue hour photography.
It’s time to get a tripod once you’ve obtained the camera. A tripod is a crucial gear for photographers in general, especially for blue hour photography; refusing to use one will result in blurry and low-quality images.
If you don’t have one and don’t want to spend a lot of money, I’ve listed some great tripods under $100, or if you want even less, there are some decent tripods under $50, that will do just fine.
The next step would be to invest in a proper lens for blue hour photography; note that not just any lens will work.
A prime lens between 16mm and 50mm is preferable for ensuring sharpness across the photo, but zoom lenses that cover these ranges will also fit the bill.
Another concern is that you will be working in low-light conditions; therefore, I recommend that you pick a bright lens, preferably one with an aperture of at least f/2.8.
While I haven’t included lenses specifically for blue hour photography, I have a list of excellent astrophotography lenses that can do the job.
A remote shutter release is another piece of equipment that I don’t think is necessary.
When using a remote shutter release, you won’t have to touch the camera to take a picture. Just like the tripod, it decreases the camera shakes.
Even if you don’t have one, you may use your camera’s timer to get the job done. When you click the shutter button, the camera will wait a few seconds before taking a picture.
When shooting during the blue hour, you can also employ a variety of filters. Filters are a great method to enhance the sky or improve long exposures.
The latter two are nice to have if you have them or can afford them, but a tripod and a lens are the most crucial tools you need to look for.
Oh, and for those cool night breezes, don’t forget to bring a cup of coffee and a nice blanket.
Camera Settings
As I mentioned above there are some settings you need to consider and even change if needed, to get the best of blue hour photography.
AutoFocus
Focus is important when shooting images in general. However, you may struggle a little with blue hour photography and that’s due to a lack of light or simply the dark background.
To avoid this, look for a bright object that your camera can lock onto, such as a well-lit structure or perhaps the moon.
You can also use the camera’s flash or an additional Speedlight, but do this one only if you need to photograph very close subjects during blue hour.
On the other hand, manual focus will be the last resort if everything else fails.
Shutter Speed
As I just stated, the sky becomes relatively dark, demanding a long shutter speed to achieve a nice exposure. You’ll also want a narrow aperture, which will bring the entire frame into sharp focus.
Most likely you’ll push your camera’s shutter speed to 30 seconds or whatever the maximum setting is.
A great tip for extra long exposures would be combining a remote shutter release with the camera’s Bulb Mode.
Bulb mode is an exposure setting on your camera that lets you hold your shutter open for as long as you wish).
ISO
The sensitivity of your camera to light is measured by ISO. A lower ISO value implies that the camera is less sensitive to light, whereas a higher ISO number indicates that the camera is more sensitive to light.
Set the ISO to its default value, which is usually ISO 100. Rather than enhancing your photo using ISO, your goal is to collect as much light as possible using shutter speed and aperture.
RAW
While this doesn’t seem important, it actually is for post-processing. A RAW file can be thought of as the raw “ingredients” of a picture that must be edited to get the full potential of the picture.
It doesn’t mean that JPEG format is bad, it’s just that you are limited in the editing process with it. On the other hand, with RAW formats you have big freedom to adjust things like shadows and color vibrance.
Frequently Asked Questions

What Type of Camera Do I Need For Blue Hour Photography?
It doesn’t really matter, be it mirrorless or DSLR.
Just make sure it is a highly capable camera and feature-rich. Cameras from big names like Canon, Nikon, and Sony will do the work for sure.
At what time is the blue hour?
The blue hour would last from about 4:10 p.m. to 4:30 p.m. if the sun sets at 4 p.m. The blue hour lasts from roughly 5:30 a.m. to 5:50 a.m. if the sun rises at 6 a.m.
Do I Need to Use Extra Lights During Blue Hour?
I wouldn’t say it’s necessary unless the environment is extremely gloomy and some light is required.
Furthermore, using extra lights will feed your creativity; some extra light could give a random image a really lovely touch.
Final Words
Despite the fact that it is visually beautiful and dramatic in a good way, it is actually quite simple to perform, aside from the timing and such. Matter of fact, with any sort of photography, you must plan ahead of time and be willing to put in the effort.
You will undoubtedly be pleased with the results if you are ready to get out there and capture this wonderful blue hour.
Just remember to play around with your settings until you find the ones that work the best and also don’t forget to bring your blanket. Oh, my apologies, I meant your tripod and lens.
This concludes the article, which hopefully provided you with some insight regarding Blue Hour photography.
Enjoy.

Wedding Photographer
From nature to urban landscapes, my camera is my tool for expressing my creativity and telling stories through my lens.