One of those terms would be the White Balance.
If you’re new to photography, chances are high that you’ve come across the term “white balance.”
If you want to learn more about it and you are wondering what exactly it means, you’ve come to the right place.
In today’s article, we’ll go over the white balance in photography and what it entails.
Let’s get right to the point without wasting any time.
What Is White Balance Photography?
White balancing is a technique for matching colors to the hue of the light source, making white things look white.
Our eyes are excellent at judging what is white under various lighting conditions, but digital cameras sometimes struggle with auto-white balance and can produce unattractive blue, orange, or even green color casts.
Many photographers don’t spend much effort on understanding how to deal with white balance and its settings, so when they see strange colors in their photographs, they don’t know how to adjust them, even though it’s much easier than you assume.
For example, have you ever shot a picture that turned out too orange or blue? It was probably not orange or blue when you glanced at the sight with your eyes. It appeared to be normal. This is because our brains adjust to changing color temperatures and only see typical colors.
Let’s find out what the color temperatures exactly are.
What is Color Temperature?
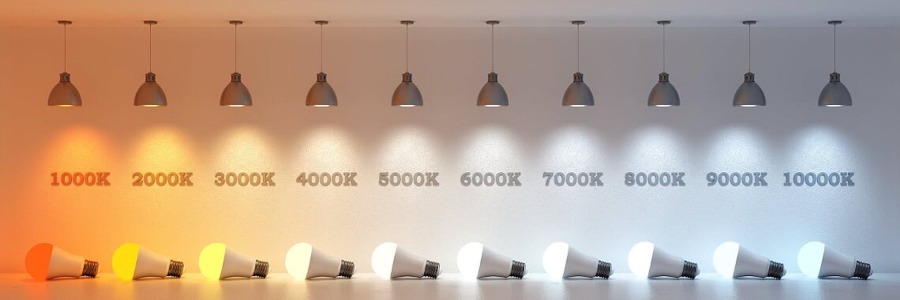
Color temperature is a term used to describe how a light bulb emits light. It is measured in Kelvin degrees (K) in a range of 1,000 to 10,000.
Mastering color temperature in photography can aid you in keeping your images correct and clear of any unnatural color.
The color temperature of a neutral color, sunlight at midday, is between 5200 and 6000K.
Most external flash units are set in that range from the factory, implying that they are attempting to mimic daylight.
Now that you know what Color Temperature is, I believe it’s much easier and clearer to grasp the White Balance.
In other words, it adds the opposite color to the image in order to return the color temperature to neutral. After properly white balancing an image, whites should seem white rather than blue or orange.
Why Is White Balance So Important In Photography?
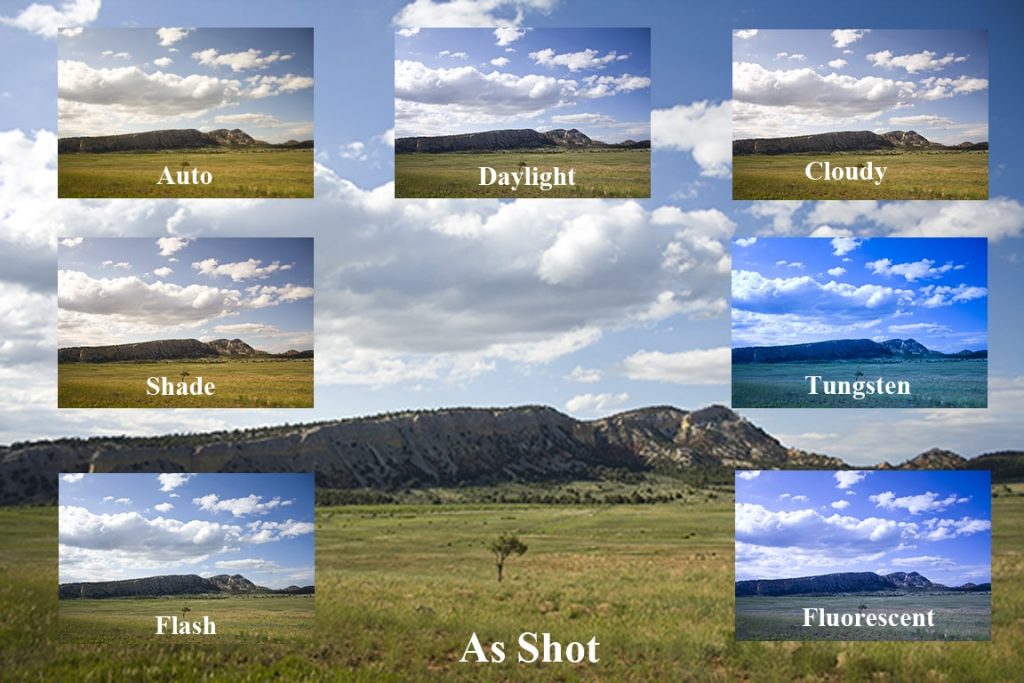
For some people, a blue or orange color might look like a good filter that gives the picture an aesthetic feeling, but using filters is another cause, while the high color temperature is not something we want to capture.
You will need to neutralize those colors or the picture won’t feel real to life or neutral as we see it.
In most cases, color casts look bad and ruin the whole point of the photo. Take, for example, product photography or portraits. If you don’t want to get hated by your customers, try to neutralize them.
There are two ways you can neutralize or white balance those colors.
- One way is to perform it through the camera settings, meaning it is an inbuilt feature
- The other way is during post-processing.
Built-In White Balancing
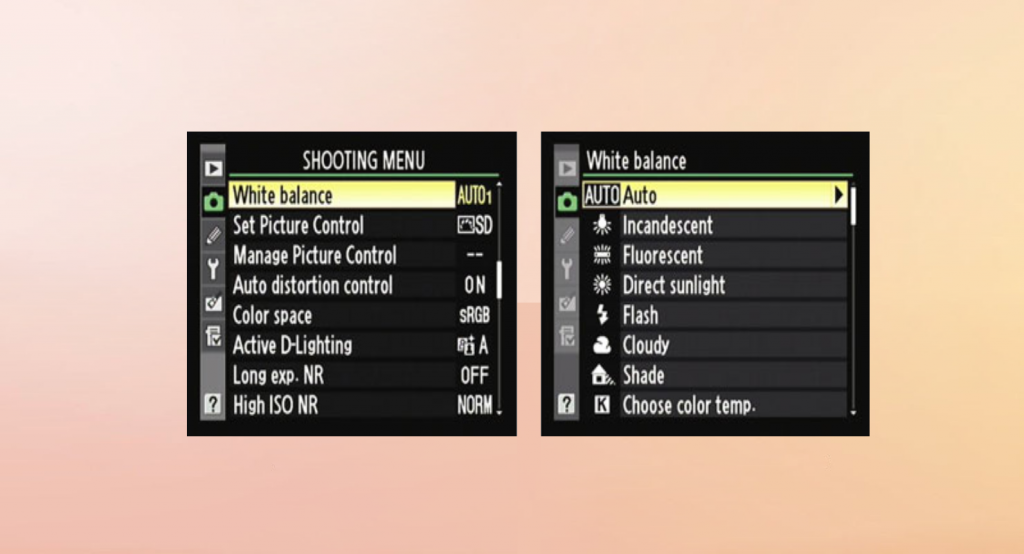
Well obviously, the easiest and the most common way people neutralize those unwanted colors are through picking the white balance feature on their camera.
When you push the WB button on your camera or go into the White Balance menu, you’ll see a list of options similar to the one shown above.
You’d pick the type of lighting that most closely resembles the ambient light in your scenario from that list.
When you do this, the camera adjusts the colors in your image to match the actual hues in the scene you’re photographing in order to compensate for the fact that you’re not shooting in a close position or in daylight.
However, I think you can see and will most likely see it on your camera to the Auto button. I would encourage you to keep things that way unless you are a professional who knows your way around cameras and color temperature.
The other modes you will encounter would be:
- Daylight – This sets the white balance around 5000k
- Cloudy – This sets the white balance around 6000k
- Shade – This sets the white balance around 8000k
- Flash – This sets the white balance around 5500k
- Tungsten – This sets the white balance around 3000K
- Fluorescent – This sets the white balance around 4200k
Editing The Pictures in White Balance
This is a simple method that does not require any action on your part while photographing.
Although once you transfer your photos to your computer, you notice all those orange and blue color temperatures. It’s time to hit it off and neutralize those colors.
If you’re shooting in RAW, you’ll be post-processing your photographs anyway, so leave your white balance on “auto.” This enables your camera to deal with in-field color temperature. If the camera makes a mistake, you can adjust it afterward with a slider in editing software.
Pretty much, that’s all there is to it.
Different editing software has different options for white balancing your images, but they’re all relatively straightforward, so you won’t have to worry about it.
Final Words
To sum up, I believe we can both agree that white balance is a really vital tool for improving the quality of your photos.
Whether you’re a hobbyist or a professional photographer, an image with neutral colors will always seem better and more professional.
I’m certain that I demonstrated at least the fundamentals of White Balance to you, and I did so in the most straightforward manner.
Hopefully, now you have a better understanding regarding it, and your photos won’t look blueish or orange.
If you still struggle with white balance and you can’t figure it out, I would highly advise you to check tutorials on how to edit the photos and neutralize the colors on your own.

Wedding Photographer
From nature to urban landscapes, my camera is my tool for expressing my creativity and telling stories through my lens.
